GNS3 VM startup error with Intel VT-x/EPT or AMD-V/RVI enabled – Resolved

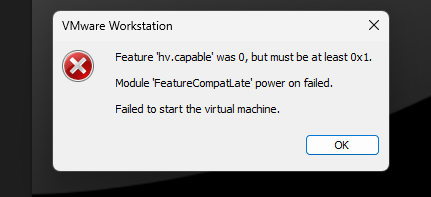
I have spent many days setting up my GNS3 LAB on my high spec laptop, only to be disappointed at the end of all that effort suddenly with a startup error “Feature ‘hv.capable’ was 0, but must be at least 0x1. Module ‘FeatureCompatLate’ power on failed. Failed to sart the virtual machine”

I have the GNS3 VM version 2.2.59 running on VMware Workstation version 25H2u1 which was working during the setup.

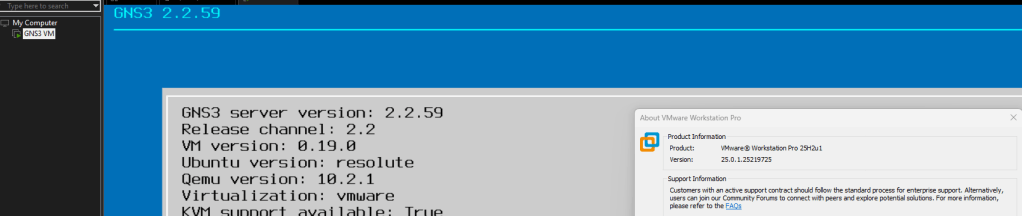
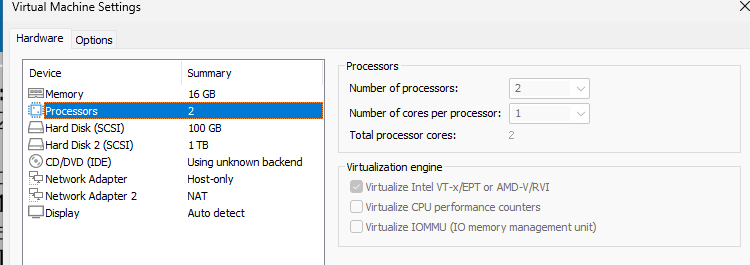
The GNS3 VM uses nested virtualization which requests the vCPU processor feature Virtualize Intel VT-x/EPT or AMD-V/RVI enabled for KVM to function in GNS3.

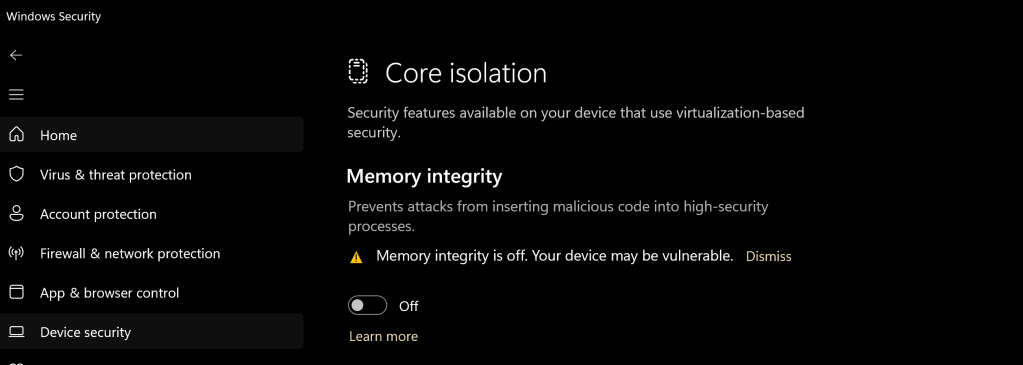
I started to investigate and research the error and it was identified that in Windows 11, the Core Isolation (Memory Integrity) feature in Windows Security –> Device Security was the cause of the error.

Resolution

In Windows Security -> Device security -> Core Isolation -> Disable Memory Integrity

Research

I did some digging to find out the root cause of the memory integrity causing error in the VMware workstation. I found out that the memory integrity is using hardware-based virtualization security which forces the CPU to grant exclusive access to the virtualization technology features to Windows restricting this features to other virtualization platform.

reference:

Virtualization applications don’t work together with Hyper-V and Hyper-V-based features

Core isolation

Resizing a Ubuntu Linux VM in Hyper-V

I had a Ubuntu VM with disk size of 12GB running in an Hyper-V environment on the physical server with limited disk space. I discovered that the VHDX disk space was not enough to run the applications I was installing on it.

In order to resolve this challenge, I had to increase the disk size of the VHDX disk and then increase the disk partition within the VM.

  1. To increase the virtual disk size, I use the powershell command:

Resize-VHD -Path "VHDX disk location" -SizeBytes 60GB

2. Then I proceed to log into to Ubuntu VM

3. Open a bash shell

4. To view the partition to increase, run the command as a root:

sudo fdisk -l

if the command is not installed, you need to run the following command first:

sudo apt install cloud-guest-utils

5. When the partition is identified, use it in the next command to expand partition into free space:

sudo growpart /dev/sda 1

Note: space between the partition and id

6. Then this command will resize the partition:

sudo resize2fs /dev/sda1

Note: no space between partition and id

    7. Dont forget the final step to reboot the ubuntu VM for the command to take effects. This is critical because it did not work until I did this step.

    I hope this helps someone who support linux.