A Cloud Engineer who is Microsoft, VCP6.5 and CCNA, CyberOPS certified.
I have experience in various on-premise technologies ranging from VoIP Telephony systems, networking, Virtualization, security, servers and Cloud.
I have changed my career path to the Cloud since it is the path that utilizes all my skillsets learnt over the years. My ultimate goal is to become a Solutions Architect who uses technologies to improve and enhance business process.
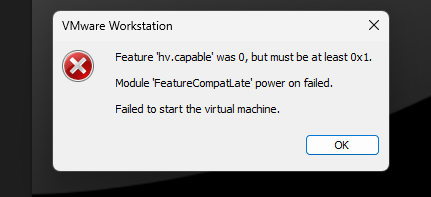
I have spent many days setting up my GNS3 LAB on my high spec laptop, only to be disappointed at the end of all that effort suddenly with a startup error “Feature ‘hv.capable’ was 0, but must be at least 0x1. Module ‘FeatureCompatLate’ power on failed. Failed to sart the virtual machine”
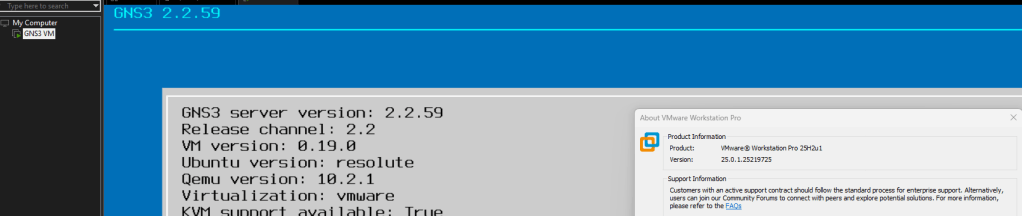
I have the GNS3 VM version 2.2.59 running on VMware Workstation version 25H2u1 which was working during the setup.
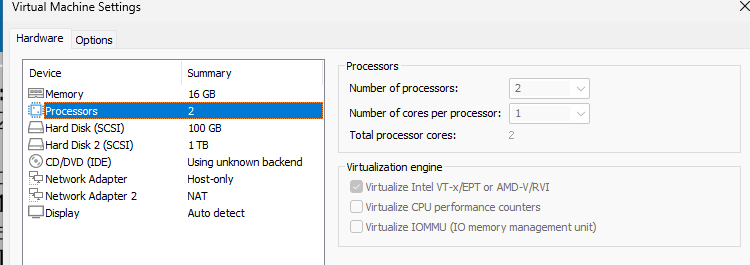
The GNS3 VM uses nested virtualization which requests the vCPU processor feature Virtualize Intel VT-x/EPT or AMD-V/RVI enabled for KVM to function in GNS3.
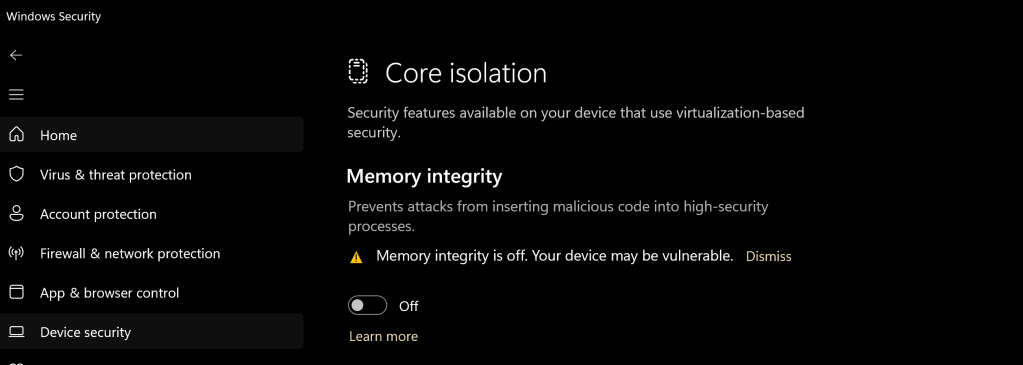
I started to investigate and research the error and it was identified that in Windows 11, the Core Isolation (Memory Integrity) feature in Windows Security –> Device Security was the cause of the error.
Resolution
In Windows Security -> Device security -> Core Isolation -> Disable Memory Integrity
Research
I did some digging to find out the root cause of the memory integrity causing error in the VMware workstation. I found out that the memory integrity is using hardware-based virtualization security which forces the CPU to grant exclusive access to the virtualization technology features to Windows restricting this features to other virtualization platform.
I have always want to use a script to disable Internet Explorer Enhanced Security Configuration (IE ESC) in Windows Server. It is an annoying activity when it is required to perform tasked using the IE in older versions of windows servers.
It is important to note that IE ESC is very important to the security of legacy servers from common past vulnerabilities which is not a risk in current versions of server OS.
This activity must be taken with precaution and on servers with access restriction to the Internet. It is encouraged that IT professional implement all measures to secure the legacy application running on these servers that must be maintained in an segmented or isolated environment. It is the responsibility of the IT professional to use a secure alternative browser after this activity has been performed.
Now here is a batch script to the rescue taken from this Microsoft FAQ that can be runned on all your servers. Save the script in a batch file and run it from the command line.
The script must run as an administrator or a logon script to work since it is making changes to the registry.
Note: The script was created for Windows Server 2003 and 2008. However, it will work for other versions such as Windows Server 2019.
ECHO OFF
REM  IEHarden Removal Project
REM  HasVersionInfo: Yes
REM  Author: Axelr
REM  Productname: Remove IE Enhanced Security
REM  Comments: Helps remove the IE Enhanced Security Component of Windows 2003 and 2008(including R2)
REM  IEHarden Removal Project End
ECHO ON
::Related Article
::933991 Standard users cannot turn off the Internet Explorer Enhanced Security feature on a Windows Server 2003-based terminal server
::http://support.microsoft.com/default.aspx?scid=kb;EN-US;933991
:: Rem out if you like to Backup the registry keys
::REG EXPORT "HKEY_LOCAL_MACHINE\SOFTWARE\Microsoft\Active Setup\Installed Components\{A509B1A7-37EF-4b3f-8CFC-4F3A74704073}" "%TEMP%.HKEY_LOCAL_MACHINE.SOFTWARE.Microsoft.Active Setup.Installed Components.A509B1A7-37EF-4b3f-8CFC-4F3A74704073.reg"
::REG EXPORT "HKEY_LOCAL_MACHINE\SOFTWARE\Microsoft\Active Setup\Installed Components\{A509B1A7-37EF-4b3f-8CFC-4F3A74704073}" "%TEMP%.HKEY_LOCAL_MACHINE.SOFTWARE.Microsoft.Active Setup.Installed Components.A509B1A8-37EF-4b3f-8CFC-4F3A74704073.reg"
REG ADD "HKEY_LOCAL_MACHINE\SOFTWARE\Microsoft\Active Setup\Installed Components\{A509B1A7-37EF-4b3f-8CFC-4F3A74704073}" /v "IsInstalled" /t REG_DWORD /d 0 /f
REG ADD "HKEY_LOCAL_MACHINE\SOFTWARE\Microsoft\Active Setup\Installed Components\{A509B1A8-37EF-4b3f-8CFC-4F3A74704073}" /v "IsInstalled" /t REG_DWORD /d 0 /f
::x64
REG ADD "HKEY_LOCAL_MACHINE\SOFTWARE\Wow6432node\Microsoft\Active Setup\Installed Components\{A509B1A8-37EF-4b3f-8CFC-4F3A74704073}" /v "IsInstalled" /t REG_DWORD /d 0 /f
::Disables IE Harden for user if set to 1 which is enabled
REG ADD "HKEY_CURRENT_USER\Software\Microsoft\Windows\CurrentVersion\Internet Settings\ZoneMap" /v "IEHarden" /t REG_DWORD /d 0 /f
REG ADD "HKEY_LOCAL_MACHINE\Software\Microsoft\Windows\CurrentVersion\Internet Settings\ZoneMap" /v "IEHarden" /t REG_DWORD /d 0 /f
REG ADD "HKEY_CURRENT_USER\Software\Wow6432Node\Microsoft\Windows\CurrentVersion\Internet Settings\ZoneMap" /v "IEHarden" /t REG_DWORD /d 0 /f
::Removing line below as it is not needed for Windows 2003 scenarios. You may need to enable it for Windows 2008 scenarios
::Rundll32 iesetup.dll,IEHardenLMSettings
Rundll32 iesetup.dll,IEHardenUser
Rundll32 iesetup.dll,IEHardenAdmin
Rundll32 iesetup.dll,IEHardenMachineNow
::This apply to Windows 2003 Servers
REG DELETE "HKEY_LOCAL_MACHINE\SOFTWARE\Microsoft\Windows\CurrentVersion\Setup\OC Manager\Subcomponents" /v "iehardenadmin" /f /va
REG DELETE "HKEY_LOCAL_MACHINE\SOFTWARE\Microsoft\Windows\CurrentVersion\Setup\OC Manager\Subcomponents" /v "iehardenuser" /f /va
REG ADD "HKEY_LOCAL_MACHINE\SOFTWARE\Microsoft\Windows\CurrentVersion\Setup\OC Manager\Subcomponents" /v "iehardenadmin" /t REG_DWORD /d 0 /f
REG ADD "HKEY_LOCAL_MACHINE\SOFTWARE\Microsoft\Windows\CurrentVersion\Setup\OC Manager\Subcomponents" /v "iehardenuser" /t REG_DWORD /d 0 /f
::REG DELETE "HKEY_LOCAL_MACHINE\SOFTWARE\Microsoft\Active Setup\Installed Components\{A509B1A7-37EF-4b3f-8CFC-4F3A74704073}" /f /va
::REG DELETE "HKEY_LOCAL_MACHINE\SOFTWARE\Microsoft\Active Setup\Installed Components\{A509B1A8-37EF-4b3f-8CFC-4F3A74704073}" /f /va
:: Optional to remove warning on first IE Run and set home page to blank. remove the :: from lines below
:: 32-bit HKCU Keys
REG DELETE "HKEY_CURRENT_USER\Software\Microsoft\Internet Explorer\Main" /v "First Home Page" /f
REG ADD "HKEY_CURRENT_USER\Software\Microsoft\Internet Explorer\Main" /v "Default_Page_URL" /t REG_SZ /d "about:blank" /f
REG ADD "HKEY_CURRENT_USER\Software\Microsoft\Internet Explorer\Main" /v "Start Page" /t REG_SZ /d "about:blank" /f
:: This will disable a warning the user may get regarding Protected Mode being disable for intranet, which is the default.
:: See article http://social.technet.microsoft.com/Forums/lv-LV/winserverTS/thread/34719084-5bdb-4590-9ebf-e190e8784ec7
:: Intranet Protected mode is disable. Warning should not appear and this key will disable the warning
REG ADD "HKEY_CURRENT_USER\Software\Microsoft\Internet Explorer\Main" /v "NoProtectedModeBanner" /t REG_DWORD /d 1 /f
:: Removing Terminal Server Shadowing x86 32bit
REG DELETE "HKEY_LOCAL_MACHINE\SOFTWARE\Microsoft\Windows NT\CurrentVersion\Terminal Server\Install\Software\Microsoft\Windows\CurrentVersion\Internet Settings\ZoneMap" /v "IEHarden" /f
:: Removing Terminal Server Shadowing Wow6432Node
REG DELETE "HKEY_LOCAL_MACHINE\SOFTWARE\Wow6432Node\Microsoft\Windows NT\CurrentVersion\Terminal Server\Install\Software\Microsoft\Windows\CurrentVersion\Internet Settings\ZoneMap" /v "IEHarden" /f
The script may display errors for some commands depending on the versions of Windows servers due the registry keys not used in that versions.
Most importantly, ensure to verify the settings changed for the Internet Explorer ESC.
In general computing, storage is a very important component of a systems because it is where all the data is stored on a systems. With this reason, it is important that when moving workloads to the Cloud, storage is a critical part of the discussion.
In this article, the focus will be on storage redundancy options in the Azure and how it works.
There are four (4) basic storage redundancy options in Azure:
Locally Redundant Storage (LRS)
Zone-Redundant Storage (ZRS)
Geo-Redundant Storage (GRS)
Geo-Zone Redundant Storage (GZRS)
To better understand how the storage redundancy, a few terms will need to be defined:
Region – it is a large geographical area. For example California or Virigina (in Azure it is referred to as West US and East US respectively)
Availability Zones (AZ) – it is a logical set of one or more datacenters within a single region. The AZ shares the same network, power and cooling which is a single point of failure for the AZ. Every Region will have alteast 1 AZ and atmost 3 AZes.
Now, I am will be going over the storage redundancy.
Locally Redundant Storage (LRS)
Within one Availability Zone, there are muliple racks of servers with storage that will support the redundancy as required. The LRS takes advantage of these storage, by making 3 copies of the data across three (3) independent storage within a datacenter (Availability Zone).
The LRS protects against system level failures which includes server and disk within a datacenter.
Zone-Redundant Storage(ZRS)
The next level of storage redundancy is ZRS which has three (3) copies of your data across three(3) availability zones (data centers). This storage redundancy protects the data against datacenter level failures which is affected by network or power outage.
For the remaining storage redundancy, the replication to the secondary region is based on the primary region selected using the region pair. Additionally, the next redundancy will need to be activated for the service to be back online.
Geo-Redunant Storage (GRS)
This storage redundancy method utilizes the LRS as part of it functionality. The data is replicated across two regions where three (3) copies of the data is created within each region. This redundancy not only increase the data available against systems failures but also against regional outage affected by natural disasters namely earthquakes, floods or hurricanes.
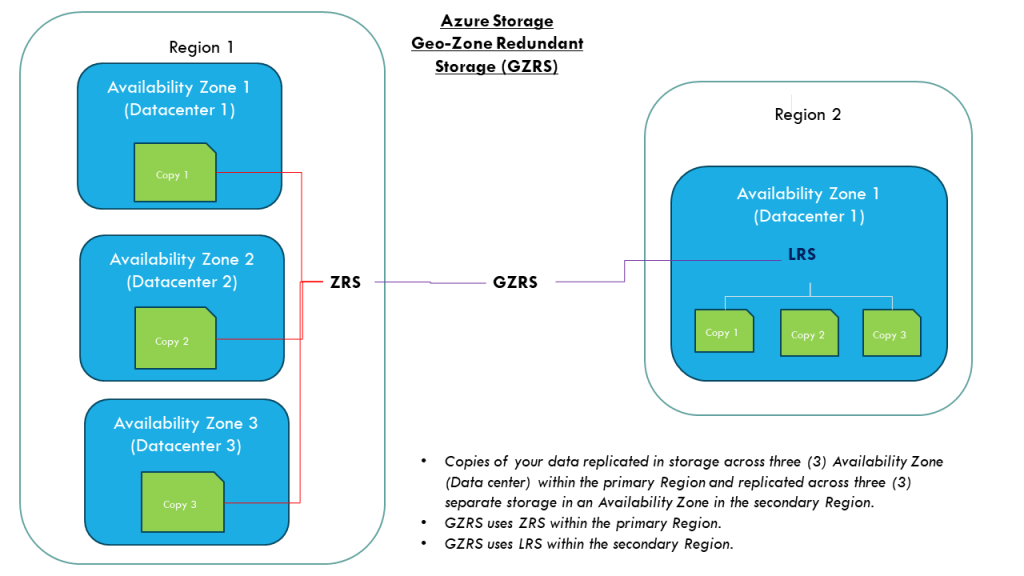
Geo-Zone Redundant Storage (GZRS)
This storage redundancy is similiar to the GZS except that the primary region use the ZRS instead of the LRS method. The benefits of redundancy GZRS verse GRS is that when there is a datacenter level failure in the primary region, the data will still be available and failover to the secondary region will not be necessary.
Limitations
Not all storage redundancy are available for all storage account type. An example is the Premium Azure Files which uses SSD-backed storage and only supports LRS and ZRS.
Conclusion
For each of the storage redundancy, selecting the right option will be based on business requirements and cost. It is important to assess the impact to the buiness and choose the option that balance cost and availability to keep the business operational.
In Microsoft Azure there are many features available to improve the resilience of your Azure resources. In this article, I am going to focus on the resilience of an Azure VM Disk.
Let me paint a scenario where a Azure VM was created with a disk as LRS (locally redundant storage). The risk with the LRS is the disks are only protected against physical failures within a single datacenter such as server rack or drive failure. However, to increase the resilience of the VM disk against datacenter failures, I recommend that it is configure as ZRS (zone-redundant storage).
To convert a disk from LRS to ZRS, the correct procedure must be followed based on whether the disk is zonal or regional. To check this state, run the following command:
Azure CLI:
az disk show –name[DiskName]–resource-group[RGName]
If the zone parameter is empty, it is an indication that it is regional otherwise it is zonal.
The disk locality will be determine which method is applied to convert the disk from LRS to ZRS. Once verified as regional continue to the next steps to start the process.
For regional disk, it is necessary to only deallocate(shutdown) the Azure VM and then convert the disk using the commands:
Firstly, gather the Azure VM and disk information and create variables to store these values:
$RGName='ResourceGroupName'
$vmDiskName='VMDiskName'
$vmSize='Standard_DS_v2'
$diskSKU='Premium_ZRS'
Get the Parent VM Id (required for sizing of the VM if disk type is changed from Premium to Standard)
$vmId= $(az disk show \
–name$vmDiskName \
–resource-group $RGName \
–query manageBy \
–output tsv)
Stop the Azure VM in preparation for disk conversion
az vm deallocate--ids$vmId
Upgrade the Azure VM size (this step is critical that VM size can support the disk SKU or the disk conversion may fail)
az vm resize –ids $vmId –size $vmSize
Convert the disk from LRS to ZRS:
az disk update –name $vmDiskName –sku$diskSKU–resource-group$RGName
Start up the VM:
az vm start –ids$vmId
If the disk is zonal:
a snapshot of the original disk will need to be created.
Then a new disk will be created from the snapshot.
when the disk is created, a new VM will be provisioned with this new disk atached.
I hope this article assist with the steps to convert a disk from LRS to ZRS.
Microsoft has provided a method to easily and conveniently share documents with other persons that are stored within your OneDrive.
How?
This capability creates a shared link which can be sent via email or shared with the person directly.
Security
With this capability, it is important that users takes precaution when sharing their information with others, especially if it is company related.
I recommend the following guidelines when using these capabilities:
1. Verify the email address of the person you are sharing the files with. This email address will be used to validate the access to that share link using access code to the email.
2. Set the correct level of access such as “can view” (which is read-only). If they don’t need to edit the files, then apply the least privilege, which is read only. It protects the files from getting modified uncessarily.
3. Establish a timeline that the person will be assessing the information and set it on the shared link. This ensures the expiration of access without human’s intervention.
4. Dont share the entire drive, all the files should be placed in a folder and the shared link created from there. It limits the access to only that folder and even if it is compromised, it is restricted to that folder only. An additional benefit is that it gives you the flexibility to share additional information with the same party. You can simply drop that files in that folder, and it is readily available to them.
It is important to note that this shared link from OneDrive is publicly accessible, which means that it will be accessed from the internet. The only safeguard is the access permissions configured as recommended.
Why?
The OneDrive is a public file storage service which provides local access on the computer.
Other OneDrive features for Business
The OneDrive for Business or organizations that uses SharePoint, there is an additional settings for restricting access based on location using the location-based policy. This setting is only configurable by administrators, and it is set on a wider scale.
There are more features which will not be discussed in this article. You can check out the Mircrosoft Learn for further details.
I had a Ubuntu VM with disk size of 12GB running in an Hyper-V environment on the physical server with limited disk space. I discovered that the VHDX disk space was not enough to run the applications I was installing on it.
In order to resolve this challenge, I had to increase the disk size of the VHDX disk and then increase the disk partition within the VM.
To increase the virtual disk size, I use the powershell command:
Resize-VHD -Path "VHDX disk location" -SizeBytes 60GB
2. Then I proceed to log into to Ubuntu VM
3. Open a bash shell
4. To view the partition to increase, run the command as a root:
sudo fdisk -l
if the command is not installed, you need to run the following command first:
sudo apt install cloud-guest-utils
5. When the partition is identified, use it in the next command to expand partition into free space:
sudo growpart /dev/sda 1
Note: space between the partition and id
6. Then this command will resize the partition:
sudo resize2fs /dev/sda1
Note: no space between partition and id
7. Dont forget the final step to reboot the ubuntu VM for the command to take effects. This is critical because it did not work until I did this step.
I have created this blog to share resources used to prepare for my Oracle Cloud Infrastructure Architect Associate Exam. The exam will be done using Online proctoring which will be my first time. Unfortunately, I am unable to take advantage of the test center option because it is not available using the Race to Certification program. As a result, I end up scheduling the exam at my work office because I have no proper enclosed sound proof room in my house to do a proctored exam.
I have created this article to reflect the title which is to provide study resources to prepare for the various Cloud Architect certifications for Oracle, Google Cloud, Amazon Web Services and Microsoft Azure. Each of them brings their own dynamics to the architecture space and has difference focus and value. When you combine the information together, it will make you a well rounded Architect. The only missing piece is the business side because these resources only bring the technology perspective and focus. To fill this gap, I have included other resources from my references who I believe are enlightening the technical community on how to approach Architects with soft skills which is more important than the technical skills (the know how). Resources are from difference sources:
This article was created for me to keep track of the Microsoft Learning resources available to acquire the knowledge needed to prepare for the Microsoft Certifications.
The material includes preparation for following certifications: