VCP65-DCV Objective 1.2 – Secure ESXi and vCenter Server

The following reference material from the vSphere 6.5 online documentation will assist you in cover the main information that is need to know the section:

  1. Enable or Disable UEFI Secure Boot for a Virtual Machine
  2. UEFI Secure Boot for ESXi Hosts
  3. Incoming and Outgoing Firewall Ports for ESXi Hosts
  4. NFS Client Firewall Behavior
  5. Securing ESXi Host
  6. Assigning Privileges for ESXi Hosts
  7. Set the vCenter Server Password Policy
  8. Lockdown Mode
  9. Disable the Managed Object Browser
  10. ESXi Passwords and Account lockout
  11. Best Practices for vCenter Server Access Control
  12. Manage Certificates with the Platform Services Controller Web Interface
  13. Using the MOB to explore the Object Model
  14. Securing vCenter Server
  15. Preventing a Virtual Machine User or Process from Disconnecting Devices

VCP65-DCV Objective 1.1 – Configure and Administer Role-based Access Control

To effectively master Objective 1.1 of the VCP65-DCV (2V0-622/D) exam guidelines which covers the topic Configure and Administer Role-based Access Control, it is important to know the following information:

(you can click on the heading to go directly to the VMware vSphere 6.5 online documentation  where these information are stored.)

  1. Multiple Permission Settings
  2. Required Privileges for Common Tasks
  3. vCenter Server System Roles
  4. Example 3: User Role Overriding Group Role
  5. Prerequisites and Required Privileges for Encryption Tasks
  6. Configuring vCenter Single Sign-On Identity Sources
  7. Understanding the vCenter Server Permission Model
  8. Permission Validation
  9. Using Roles to Assign Privileges

Setting Up iSCSI in VMware ESXi 5.5

To begin this article, let me first discuss what is iSCSI and then the reason for requiring an iSCSI.

I love the definition of iSCSI provided by searchstorage.techtarget.com which stands for Internet Small Computer System Interface, that works on top of the Transport Control Protocol (TCP) and allows the SCSI command to be sent end-to-end over local-area networks (LANs), wide-area networks (WANs) or the Internet.

According to the same site, iSCSI works by transporting block-level data from an iSCSI initiator on a server and a iSCSI target on a storage device. The iSCSI protocol encapsulates SCSI commands and assembles the data in packets for the TCP/IP layer. Packets are sent over the network using a point-to-point connection.

The one of the main reason for using iSCSI connections is that it allows for the utilization of existing network resources such as NICs and network switches to present storage devices to servers once it has the iSCSI initiator software. this result in cost saving and it is is easily configured and it is available for both LAN, WAN and internet which mean easily access if it is relocated to the cloud

Now, let us go to the fun part…configuration of iSCSI in Vmware ESXi 5.5

It is important to note that there are two type of iSCSI initiator/target:

  1. Software
  2. Hardware

In this article, we are only going to go through the configuring of the Software iSCSI initiator from within the VMware Esxi 5.5 hypervisor.

Log into vSphere Web client

Select Host and Clusters

hostandcluster.png

Select the host you want you want to setup the the iSCSI Software adapter on.

Under the Host pane, select the Manage

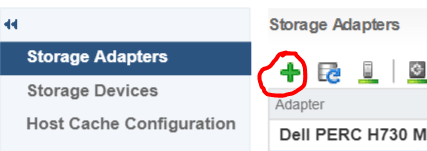
Under Manage, Select Storage then Storage Adapters

ManageStorage_StorageAdapter

Select the Plus button

Storage-menu

Select Software iSCSI Adapter

software iscsi

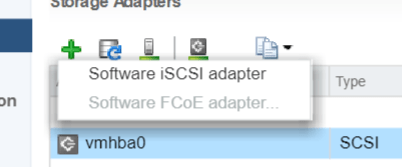
Select OK to the following message

software-iscsi-msg-e1503502080853.png

Under Storage Adapters list, look for iSCSI Software Adapter and you will see the iSCSI Software Adapter listed.

software-iscsi-adapter.png

Highlight the adapter vmhbaXX (e.g. vmhba40) and under Adapter Detail, select Target –> Dynamic –> Add

AddDynamicTarget

Note: this allows you to add the primary IP address of the SAN or storage which allows the device LUNs to be discovered.

Enter the IP address of the target and leave the default port of 3260 for ISCSI communication. Then Select OK. For every iSCSI target, the IP address should be added.

SendTargetServer


CIA – Confidentiality, Integrity and Availability

Confidentiality – is the method of ensuring that only authorized persons are able to view the company data.

Integrity – is the method of ensuring that only authorized persons are allowed to modify the company data.

Availability – is the method of ensuring that the authorized persons are able to access the company data when it is need.

Preparing for VCP 6.5 DCV Delta Exam (2V0-622D)

I had prepared and passed my VMware VCP 6.5 DCV Exam (2V0-622D) within 2 months of my VCP certification expiration date in June 2018.

It was a rough and challenging journey but I had overcome all obstacles by using the following techniques. I prepared for my exam doing self study using:

I also created a study plan schedule using the exam guidelines covering each objectives section for one day. For an up to date exam guidelines, please refer to the VMware website.

Exam Topics –  (Sections hyperlinked to my study notes reference material)
Section 1 – Configure and Administer vSphere 6.x Security
Objective 1.1 – Configure and Administer Role-based Access Control
Objective 1.2 – Secure ESXi and vCenter Server
Objective 1.3 –Configure and Enable SSO and Identity Sources
Objective 1.4 – Secure vSphere Virtual Machines
Section 2 – Configure and Administer vSphere 6.x Networking
Objective 2.1 – Configure policies/features and verify vSphere networking
Objective 2.2 – Configure Network I/O control (NIOC)
Section 3 –Configure and Administer vSphere 6.x Storage
Objective 3.1 – Manage vSphere Integration with Physical Storage
Objective 3.2 – Configure Software-Defined Storage
Objective 3.3 – Configure vSphere Storage Multipathing and Failover
Objective 3.4 – Perform VMFS and NFS configurations and upgrades
Objective 3.5 – Set up and Configure Storage I/O Control (SIOC)
Section 4 – Upgrade a vSphere Deployment to 6.x
Objective 4.1 – Perform ESXi Host and Virtual Machine Upgrades
Objective 4.2 – Perform vCenter Server Upgrades (Windows)
Objective 4.3 – Perform vCenter Server migration to VCSA
Section 5 – Administer and Manage vSphere 6.x Resources
Objective 5.1 –Configure Multilevel Resource Pools
Objective 5.2 – Configure vSphere DRS and Storage DRS Clusters
Section 6 – Back up and Recover a vSphere Deployment
Objective 6.1 – Configure and Administer vCenter Appliance Backup/Restore
Objective 6.2 – Configure and Administer vCenter Data Protection
Objective 6.3 – Configure vSphere Replication
Section 7 – Troubleshoot a vSphere Deployment
Objective 7.1 – Troubleshoot vCenter Server and ESXi Hosts
Objective 7.2 – Troubleshoot vSphere Storage and Networking
Objective 7.3 – Troubleshoot vSphere Upgrades and Migrations
Objective 7.4 – Troubleshoot Virtual Machines
Objective 7.5 – Troubleshoot HA and DRS Configurations and Fault Tolerance
Section 8 – Deploy and Customize ESXi Hosts
Objective 8.1 – Configure Auto Deploy for ESXi Hosts
Objective 8.2 – Create and Deploy Host Profiles
Section 9 – Configure and Administer vSphere and vCenter Availability Solutions
Objective 9.1 – Configure vSphere HA Cluster Features
Objective 9.2 – Configure vCenter Server Appliance (VCSA) HA
Section 10 – Administer and Manage vSphere Virtual Machines
Objective 10.1 – Create and Manage vSphere Virtual Machines and Templates
Objective 10.2 – Create and Manage a Content Library
Objective 10.3 – Objective 10.3 is no longer covered in the exam content.
Objective 10.4 – Consolidate Physical Workloads using VMware vCenter Converter

Later, I will add my study notes to assists anyone with the information  gathered while studying. Stay tune.

Almost caught by Spam

I had receive the following spam email which seems to come from Paypal:

Spam_email_paypalMarch132018_edit

At first glance, it looks very legitimate but after close inspection, it was discovered to be a spam. This provides the opportunity to highlight some indications that the email received is a spam and how to mitigate against it.

  • Check the email address that it is coming from. Not the one that is displayed at first glance but when it is opened, the email address that is between these symbols <>. In the example above, it says it is coming from service@paypal-int.co.uk. (Paypal correct address is service@intl.paypal.com).


  • Check where the link that you are asked to click on is point to by just hovering the mouse pointer over the hyperlink and look at the bottom of the browser. The spam email said the following:

    If you did not initiate this payment, we recommend that you go to Manage/Cancel Payment

    The Manage/Cancel payment was pointing to an unknown URL and not to the Paypal website so you know that it is a malicious website it is asking you to click on.


  • Usually the greeting will include the email address it is sent to. In this case, I was address by my email address (*****@gmail.com) and not by my full name which the Paypal will have on record.

Now for those who are unsure if this event actually happened that the email is stating. Verify the transaction by logging on directly to your website or portal (not using the email links) in my case Paypal.com and check if any such event has occurred.

I hope this is helpful and don’t be fooled by well crafted spam emails.

Keep safe…Keep secure

Error opening default Windows 10 App

When Windows 10 came out with a free option to upgrade, I took the liberate to take up the offer to do it later when I had the time. This selection allowed me to download the Windows 10 ISO file so that I can installed it at a later time during my free time.

After completing the upgrade to Windows 10, I noticed that I had the issue of not able to open native windows applications such as the Calculator as it would generate the following error seen below:

Windows Calculator

Doing my investigation, I realized that the issue was as a result of the MUI language pack (English US) not installed on my computer completely.

Solution: To fix this problem, you had to first find out what Windows version build you had installed (my own was 10240) and then you would search on the Microsoft website to download the package for you built.

After you have gotten the MUI langauge pack (lp), you will run the following command to install it from RUN:

  1. To access RUN, use shortcut key Win + R or type run in the Start menu
  2. enter the command lpksetup.exe  lpksetup_run
  3. Select Install display languages  lpksetup_win1
  4. Browse for the lp file and select Next (note if it say it is incorrect then you downloaded the incorrect version for your OS build)lpksetup_win2
  5. Wait for it to complete and then you are done.

After you have applied the solution then restart your computer and you are good.

Simple Computer Security Tips

As a computer user, we sometimes take for granted the numerous threats that are out on the internet that can steal and even take over our computers without our permission. It is important that we are aware of the threats that can affects us by just browsing the internet.

I would like to share a few simple tips that will help any person to protect themselves from the various treats on the internet.

  1. Install an Anti-virus software on your computer – this is one of the most important task that any person can do to protect their computer from viruses or malware that can cause our computer to behave abnormal or render it unusable. There are a few paid anti-virus software I can recommend such as Norton Security, Kaspersky Anivirus, ESET Security and McAfee Antivirus. If you dont want to spend money on this then there are also good free antivirus software such as Avast, AVG and Microsoft Security Essential.
  2. Remove the admin privileges from your default user account – This is a very important task because a lot of persons don’t realize that when you have administrator right on your user account that you use daily any changes can be made to the compute without restriction. It is not good because if your computer does get infected then the malicious software can make unwanted changes and you will not have control over it. I recommend that you create a different account with admin rights, then change the user account you use daily to a standard user. See instructions here on how to do this on Windows 10.
  3. Ensure that windows firewall is enabled – This is especially important for person who connect to any and every open WiFi that comes there way. Having the firewall enabled can reduce the likelihood of a unauthorized person from connecting or access your computer from these free open networks. for steps on how to check or enable to windows firewall on your computer, go here. Note: that the latest windows come with the Windows firewall turned on by default.
  4. Backup documents to a secure cloud space – This tip might seem trivial but it is one of the most important task to do. This task does not only protect you from hackers wiping out your data but also protects the important information from devices fail or a computer crash. To accomplish this task you can use one of the free large cloud space such as Google Drive and OneDrive. Note that they also have a desktop sync tool that allows you to sync local folders to the cloud once you are connected to the internet.
  5. Don’t visit any websites that are labelled as unsecure or unsafe – Whether browsing the internet or searching for information to assist in doing a task, we will sometimes get a message from our browser warning us that this site is unsecure. It is best that we don’t continue unless we are absolutely sure that it is legitimate or safe. Current reputable browser such as Google Chrome, Internet Explorer (or Edge) or Firefox has built in Certification Authority that checks a website’s certificate for its authenticity. This is important because we can be visiting a website that is developed by a hacker to get access to our computer or retrieve information from it.

These are the tips in a nutshell but if there are any more, I will update this list. I just want remind you to keep safe and do as much as you can to protect your personal data.

Installing Windows Features using PowerShell

I was on a drive to enable SNMP feature on all our Windows 2012 R2 servers in order to monitor the CPU, Memory and Disk utilization through WMI.

Trying to do this manually using the Windows Roles and Features for over 40 servers was not practical as it was time consuming. As a result, I venture out to seek a way to do this on a widescale in the shortest possible time.

Now here comes Powershell, it has save the day with it’s easy-to-use cmdlets and remote execution from any Windows machine.

I am now going take this opportunity to show what I have done to complete this task.

The following cmdlet is what you will use to install any windows features from the server roles:

This cmdlet is used to get the Windows features that are currently installed on the server:

Get-WindowsFeature [FeatureName] -computerName [NameOfComputer]

You can include the Features name in the command in order to get the status of the particular feature.

This cmdlet is used to install the windows features:

Install-WindowsFeature [FeatureName] -computerName [NameOfComputer]

Using the cmdlets above, the following commands were executed to install the SNMP-Service feature:

PS C:\> Get-WindowsFeature SNMP-Service -ComputerName TestWinServer

results:

SNMP-GetFeature

Installing Windows features SNMP-Service for the 2012 R2 server TestWinServer

PS C:\> Install-WindowsFeature SNMP-Service -ComputerName TestWinServer

Results:

SNMP-InstallFeature

After installing this feature, I was able to configure the SNMP services and set my monitoring tool to pull the information from WMI using snmp.

I hope this article was helpful.

Avoid using Fiber Transceivers for Switch Connection

I am dedicating this article to an experience I had with connecting switches using 10/100 Base-T 100Base-FX fiber converters (Transceivers).

It is a pain when the transceivers goes bad especially if it is not identified as causing packet loss or slow link connection on the switched network.

I had an experience were a location was complaining of having slow connection to the server resources and the IP phones were having poor call quality. When the user is on a call, the caller will hear the person very clearly but the other user would constantly hear drop in the conversation.

When a ping test was done, for every 5 or 10 ping response, the packet will drop, even to the uplink switch. When a ping test is done to the same switch, it was successful with no packet loss.

Looking at the interfaces status, there was no indication of any CRC errors or other parameters such as runts or interface reset indicating no problem with cable.

I connected my laptop directly to the transceiver and did a ping test and the same result. This is where I concluded that the problem was with the transceiver; low and behold when I swap out the transceiver for the direct fiber connection to the switches, all connection issues just disappear.

Conclusion:  Avoid using transceivers to connect switches over fiber links, as much as possible use SFP modules because when the transceivers goes bad, they cause latency to the connected location. Also I have noticed that the devices are very unreliable and are fragile hence they are high maintenance and a waste of time, effort and money which most of us Engineers don’t have time to waste.