Disable IE Enhanced Security Configuration in Windows Server via script

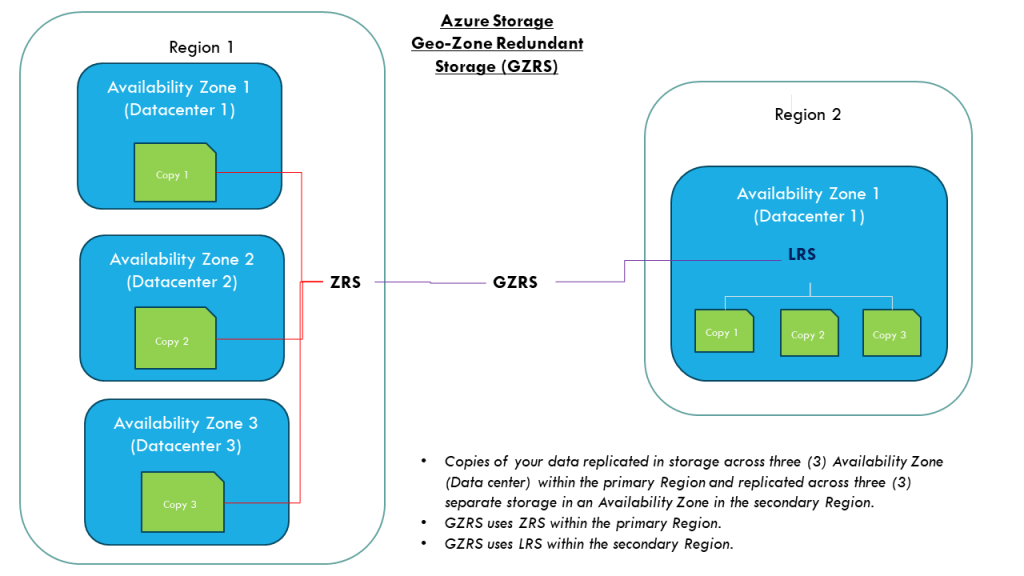
I have always want to use a script to disable Internet Explorer Enhanced Security Configuration (IE ESC) in Windows Server. It is an annoying activity when it is required to perform tasked using the IE in older versions of windows servers.

It is important to note that IE ESC is very important to the security of legacy servers from common past vulnerabilities which is not a risk in current versions of server OS.

This activity must be taken with precaution and on servers with access restriction to the Internet. It is encouraged that IT professional implement all measures to secure the legacy application running on these servers that must be maintained in an segmented or isolated environment. It is the responsibility of the IT professional to use a secure alternative browser after this activity has been performed.

Now here is a batch script to the rescue taken from this Microsoft FAQ that can be runned on all your servers. Save the script in a batch file and run it from the command line.

The script must run as an administrator or a logon script to work since it is making changes to the registry.

Note: The script was created for Windows Server 2003 and 2008. However, it will work for other versions such as Windows Server 2019.

ECHO OFF
REM  IEHarden Removal Project
REM  HasVersionInfo: Yes
REM  Author: Axelr
REM  Productname: Remove IE Enhanced Security
REM  Comments: Helps remove the IE Enhanced Security Component of Windows 2003 and 2008(including R2)
REM  IEHarden Removal Project End
ECHO ON
::Related Article
::933991 Standard users cannot turn off the Internet Explorer Enhanced Security feature on a Windows Server 2003-based terminal server
::http://support.microsoft.com/default.aspx?scid=kb;EN-US;933991
:: Rem out if you like to Backup the registry keys
::REG EXPORT "HKEY_LOCAL_MACHINE\SOFTWARE\Microsoft\Active Setup\Installed Components\{A509B1A7-37EF-4b3f-8CFC-4F3A74704073}" "%TEMP%.HKEY_LOCAL_MACHINE.SOFTWARE.Microsoft.Active Setup.Installed Components.A509B1A7-37EF-4b3f-8CFC-4F3A74704073.reg"
::REG EXPORT "HKEY_LOCAL_MACHINE\SOFTWARE\Microsoft\Active Setup\Installed Components\{A509B1A7-37EF-4b3f-8CFC-4F3A74704073}" "%TEMP%.HKEY_LOCAL_MACHINE.SOFTWARE.Microsoft.Active Setup.Installed Components.A509B1A8-37EF-4b3f-8CFC-4F3A74704073.reg"
REG ADD "HKEY_LOCAL_MACHINE\SOFTWARE\Microsoft\Active Setup\Installed Components\{A509B1A7-37EF-4b3f-8CFC-4F3A74704073}" /v "IsInstalled" /t REG_DWORD /d 0 /f
REG ADD "HKEY_LOCAL_MACHINE\SOFTWARE\Microsoft\Active Setup\Installed Components\{A509B1A8-37EF-4b3f-8CFC-4F3A74704073}" /v "IsInstalled" /t REG_DWORD /d 0 /f
::x64
REG ADD "HKEY_LOCAL_MACHINE\SOFTWARE\Wow6432node\Microsoft\Active Setup\Installed Components\{A509B1A8-37EF-4b3f-8CFC-4F3A74704073}" /v "IsInstalled" /t REG_DWORD /d 0 /f
::Disables IE Harden for user if set to 1 which is enabled
REG ADD "HKEY_CURRENT_USER\Software\Microsoft\Windows\CurrentVersion\Internet Settings\ZoneMap" /v "IEHarden" /t REG_DWORD /d 0 /f
REG ADD "HKEY_LOCAL_MACHINE\Software\Microsoft\Windows\CurrentVersion\Internet Settings\ZoneMap" /v "IEHarden" /t REG_DWORD /d 0 /f
REG ADD "HKEY_CURRENT_USER\Software\Wow6432Node\Microsoft\Windows\CurrentVersion\Internet Settings\ZoneMap" /v "IEHarden" /t REG_DWORD /d 0 /f
::Removing line below as it is not needed for Windows 2003 scenarios. You may need to enable it for Windows 2008 scenarios
::Rundll32 iesetup.dll,IEHardenLMSettings
Rundll32 iesetup.dll,IEHardenUser
Rundll32 iesetup.dll,IEHardenAdmin
Rundll32 iesetup.dll,IEHardenMachineNow
::This apply to Windows 2003 Servers
REG DELETE "HKEY_LOCAL_MACHINE\SOFTWARE\Microsoft\Windows\CurrentVersion\Setup\OC Manager\Subcomponents" /v "iehardenadmin" /f /va
REG DELETE "HKEY_LOCAL_MACHINE\SOFTWARE\Microsoft\Windows\CurrentVersion\Setup\OC Manager\Subcomponents" /v "iehardenuser" /f /va
REG ADD "HKEY_LOCAL_MACHINE\SOFTWARE\Microsoft\Windows\CurrentVersion\Setup\OC Manager\Subcomponents" /v "iehardenadmin" /t REG_DWORD /d 0 /f
REG ADD "HKEY_LOCAL_MACHINE\SOFTWARE\Microsoft\Windows\CurrentVersion\Setup\OC Manager\Subcomponents" /v "iehardenuser" /t REG_DWORD /d 0 /f
::REG DELETE "HKEY_LOCAL_MACHINE\SOFTWARE\Microsoft\Active Setup\Installed Components\{A509B1A7-37EF-4b3f-8CFC-4F3A74704073}" /f /va
::REG DELETE "HKEY_LOCAL_MACHINE\SOFTWARE\Microsoft\Active Setup\Installed Components\{A509B1A8-37EF-4b3f-8CFC-4F3A74704073}" /f /va
:: Optional to remove warning on first IE Run and set home page to blank. remove the :: from lines below
:: 32-bit HKCU Keys
REG DELETE "HKEY_CURRENT_USER\Software\Microsoft\Internet Explorer\Main" /v "First Home Page" /f
REG ADD "HKEY_CURRENT_USER\Software\Microsoft\Internet Explorer\Main" /v "Default_Page_URL" /t REG_SZ /d "about:blank" /f
REG ADD "HKEY_CURRENT_USER\Software\Microsoft\Internet Explorer\Main" /v "Start Page" /t REG_SZ /d "about:blank" /f
:: This will disable a warning the user may get regarding Protected Mode being disable for intranet, which is the default.
:: See article http://social.technet.microsoft.com/Forums/lv-LV/winserverTS/thread/34719084-5bdb-4590-9ebf-e190e8784ec7
:: Intranet Protected mode is disable. Warning should not appear and this key will disable the warning
REG ADD "HKEY_CURRENT_USER\Software\Microsoft\Internet Explorer\Main" /v "NoProtectedModeBanner" /t REG_DWORD /d 1 /f
:: Removing Terminal Server Shadowing x86 32bit
REG DELETE "HKEY_LOCAL_MACHINE\SOFTWARE\Microsoft\Windows NT\CurrentVersion\Terminal Server\Install\Software\Microsoft\Windows\CurrentVersion\Internet Settings\ZoneMap" /v "IEHarden" /f
:: Removing Terminal Server Shadowing Wow6432Node
REG DELETE "HKEY_LOCAL_MACHINE\SOFTWARE\Wow6432Node\Microsoft\Windows NT\CurrentVersion\Terminal Server\Install\Software\Microsoft\Windows\CurrentVersion\Internet Settings\ZoneMap" /v "IEHarden" /f

The script may display errors for some commands depending on the versions of Windows servers due the registry keys not used in that versions.

Most importantly, ensure to verify the settings changed for the Internet Explorer ESC.

Improving the Resilence of Azure VM Disk

In Microsoft Azure there are many features available to improve the resilience of your Azure resources. In this article, I am going to focus on the resilience of an Azure VM Disk.

Let me paint a scenario where a Azure VM was created with a disk as LRS (locally redundant storage). The risk with the LRS is the disks are only protected against physical failures within a single datacenter such as server rack or drive failure. However, to increase the resilience of the VM disk against datacenter failures, I recommend that it is configure as ZRS (zone-redundant storage).

To convert a disk from LRS to ZRS, the correct procedure must be followed based on whether the disk is zonal or regional. To check this state, run the following command:

Azure CLI:

az disk show –name [DiskName] –resource-group [RGName]

If the zone parameter is empty, it is an indication that it is regional otherwise it is zonal.

The disk locality will be determine which method is applied to convert the disk from LRS to ZRS. Once verified as regional continue to the next steps to start the process.

For regional disk, it is necessary to only deallocate(shutdown) the Azure VM and then convert the disk using the commands:

Firstly, gather the Azure VM and disk information and create variables to store these values:

$RGName='ResourceGroupName'

$vmDiskName='VMDiskName'

$vmSize='Standard_DS_v2'

$diskSKU='Premium_ZRS'

Get the Parent VM Id (required for sizing of the VM if disk type is changed from Premium to Standard)

$vmId= $(az disk show \

–name$vmDiskName \

–resource-group $RGName \

–query manageBy \

–output tsv)

Stop the Azure VM in preparation for disk conversion

az vm deallocate --ids $vmId

Upgrade the Azure VM size (this step is critical that VM size can support the disk SKU or the disk conversion may fail)

az vm resize –ids $vmId –size $vmSize

Convert the disk from LRS to ZRS:

az disk update –name $vmDiskName –sku $diskSKU –resource-group $RGName

Start up the VM:

az vm start –ids $vmId

If the disk is zonal:

  • a snapshot of the original disk will need to be created.
  • Then a new disk will be created from the snapshot.
  • when the disk is created, a new VM will be provisioned with this new disk atached.

I hope this article assist with the steps to convert a disk from LRS to ZRS.

Reference:

Disk Migration LRS to ZRS

Securing the Microsoft OneDrive share

Microsoft has provided a method to easily and conveniently share documents with other persons that are stored within your OneDrive.

How?

This capability creates a shared link which can be sent via email or shared with the person directly.

Security

With this capability, it is important that users takes precaution when sharing their information with others, especially if it is company related.

I recommend the following guidelines when using these capabilities:

1. Verify the email address of the person you are sharing the files with. This email address will be used to validate the access to that share link using access code to the email.

2. Set the correct level of access such as “can view” (which is read-only). If they don’t need to edit the files, then apply the least privilege, which is read only. It protects the files from getting modified uncessarily.

3. Establish a timeline that the person will be assessing the information and set it on the shared link. This ensures the expiration of access without human’s intervention.

4. Dont share the entire drive, all the files should be placed in a folder and the shared link created from there. It limits the access to only that folder and even if it is compromised, it is restricted to that folder only. An additional benefit is that it gives you the flexibility to share additional information with the same party. You can simply drop that files in that folder, and it is readily available to them.

It is important to note that this shared link  from OneDrive is publicly accessible, which means that it will be accessed from the internet. The only safeguard is the access permissions configured as recommended.

Why?

The OneDrive is a public file storage service which provides local access on the computer.

Other OneDrive features for Business

The OneDrive for Business or organizations that uses SharePoint, there is an additional settings for restricting access based on location using the location-based policy. This setting is only configurable by administrators, and it is set on a wider scale.

There are more features which will not be discussed in this article. You can check out the Mircrosoft Learn for further details.

Microsoft Certification Learning Resources

This article was created for me to keep track of the Microsoft Learning resources available to acquire the knowledge needed to prepare for the Microsoft Certifications.

The material includes preparation for following certifications:

  • AZ-900
  • AZ-104
  • AZ-800/AZ-801
  • AZ-500
  • AZ-700
  • AZ-305
  • AZ-400
  • AZ-140
  • SC-300
  • MS-900
  • MS-500 (expires June 30, 2023)
  • MS-100/ MS-101 (expires July 31, 2023) / MS-102
  • AI-900
  • AI-102
  • DP-900
  • DP-420
  • DP-300

Microsoft Learn
https://learn.microsoft.com/en-us/

Microsoft Learning Lab Exercises
https://github.com/MicrosoftLearning

Microsoft Azure Connected Learning Experience (CLX)
https://clx.cloudevents.ai/events/39366311-ad15-4b90-9364-0252213842fa

Microsoft Partner Training
https://partner.microsoft.com/en-us/training/training-events

MS365 Lab Resources for Microsoft Partner
https://transform.microsoft.com/modernwork/partner

Microsoft Learn Lab Exercise
https://microsoftlearning.github.io/AZ500-AzureSecurityTechnologies/
https://microsoftlearning.github.io/MS-500-Microsoft-365-Security/
https://microsoftlearning.github.io/SC-300-Identity-and-Access-Administrator/
https://microsoftlearning.github.io/AZ-104-MicrosoftAzureAdministrator/

https://microsoftlearning.github.io/AZ-305-DesigningMicrosoftAzureInfrastructureSolutions/

https://microsoftcloudworkshop.com/

https://microsoftlearning.github.io/AZ500-AzureSecurityTechnologies/

https://microsoftlearning.github.io/AZ-140-Configuring-and-Operating-Microsoft-Azure-Virtual-Desktop/

https://microsoftlearning.github.io/AZ400-DesigningandImplementingMicrosoftDevOpsSolutions/

Microsoft Simulation Guide

https://mslearn.cloudguides.com/en-us/guides/AZ-900%20Exam%20Guide%20-%20Azure%20Fundamentals
https://mslabs.cloudguides.com/guides/DP-900%20Exam%20Guide%20-%20Azure%20Data%20Fundamentals
https://mslabs.cloudguides.com/guides/AI-900%20Exam%20Guide%20-%20Azure%20AI%20Fundamentals

https://mslabs.cloudguides.com/guides/AZ-104%20Exam%20Guide%20-%20Microsoft%20Azure%20Administrator

https://mslabs.cloudguides.com/guides/AZ-700%20Lab%20Simulations%20-%20Designing%20and%20implementing%20Microsoft%20Azure%20networking%20solutions

https://mslabs.cloudguides.com/guides/AZ-800%20Lab%20Simulations%20-%20Administering%20Windows%20Server%20Hybrid%20Core%20Infrastructure

https://mslabs.cloudguides.com/guides/AZ-801%20Lab%20Simulations%20-%20Configuring%20Windows%20Server%20Hybrid%20Advanced%20Services

https://mslabs.cloudguides.com/guides/DP-300%20Lab%20Simulations%20-%20Administering%20Microsoft%20Azure%20SQL%20solutions

https://mslabs.cloudguides.com/guides/AI-102%20Lab%20Simulations%20-%20Designing%20and%20implementing%20a%20Microsoft%20Azure%20AI%20solution

https://mslabs.cloudguides.com/guides/DP-420%20Lab%20Simulations%20-%20Designing%20and%20implementing%20cloud-native%20applications%20using%20Microsoft%20Azure%20Cosmos%20DB

Third party resources:

John Savill – https://learn.onboardtoazure.com/

Susanth Sutheesh – https://www.aguidetocloud.com/

Microsoft Azure Paid Labs environment and Training – ACloudGuru.com

I will update this list as times progresses and the information changes.

Disclaimer: all information is provided as is and if there are any changes Microsoft website is the ultimate authority and the respective producers.

AZ-104 – Microsoft Azure Administrator : Managing Identities and Governance- Manage Azure Active Directory (Azure AD) objects

This article will show the configuration commands required to complete the objectives on the exam guide for the AZ-104. The article information is updated as I complete the respective tasks.

Manage Azure Active Directory (Azure AD) objects

  • Create users and groups

Azure CLI

# Create user

az ad user create –display-name “Full Name” –user-principal-name “Firstname.lastname@domain.com”

# Create user group

az ad group create –display-name “Group Name” –mail-nickname “GroupName”

PowerShell

# Create user

New-AzADuser -DisplayName “Full Name” -UserPrincipalName “Firstname.lastname@domain.com” -MailNickName “FullName”

#Create Group

New-AzADGroup -DisplayName “Group Name” -MailNickName “Groupname”

  • Create administrative units

Azure CLI

# Comment

az noun verb –name variable

PowerShell

# Create a Administrative Unit

New-AzureADMSAdministrativeUnit -DisplayName “NameOfAdminUnit” -Descrption “DescriptionOfAdminUnit”

# Remove a Administrative Unit

Remove-AzureADMSAdministrativeUnit –

  • Manage user and group properties

Azure CLI

# Comment

az noun verb –name variable

PowerShell

# Comment

Verb-Noun -Parameters variable

  • Perform bulk user updates

Azure CLI

# Comment

az noun verb –name variable

PowerShell

# Comment

Verb-Noun -Parameters variable

  • Manage device settings

Azure CLI

# Comment

az noun verb –name variable

PowerShell

# Comment

Verb-Noun -Parameters variable

  • configure Azure AD join

Azure CLI

# Comment

az noun verb –name variable

PowerShell

# Comment

Verb-Noun -Parameters variable

  • Configure self-services password reset

Azure CLI

# Comment

az noun verb –name variable

PowerShell

# Comment

Verb-Noun -Parameters variable

AZ-104 – Microsoft Azure Administrator : Manage Azure Identities and Governance – Manage Role-based access control (RBAC)

This article will show the configuration commands required to complete the objectives on the exam guide for the AZ-104. The article information is updated as I complete the respective tasks.

Manage Role-based Access Control (RBAC)

  • Create a custom role

Azure CLI

# Comment

az noun verb –name variable

PowerShell

# Comment

Verb-Noun -Parameters variable

  • Provide access to Azure resources by assigning roles at different scopes

Azure CLI

# Assigning role Owner to subscription scope

az role assignment create \

–assignee “rbacuser@domain.com” \

–role “Owner” \

— scope “scope_name_or_id”

#Assign role Contributor to resource level

az role assignment create \

–assignee “user@domain.com” \

–scope “/subscriptions/[subid]/resourceGroups/[rgid]/provider/Microsoft.Compute/virtualMachines/[myVM1” \

–role “Contributor”

#Delete role assignment

az role assignment delete \

–assignee “deleteuser@domain.com” \

–scope “scope_name_or_id” \

–role “Owner”

#view all role assignment

az role assignment list –all

PowerShell

# Assigned Owner role at scope level

New -AzRoleAssignment -SignInName “rbacuser@domain.com” `

-RoleDefinitionName “Owner” -scope “scope_name_or_id”

#Delete role assignment

Remove-RoleAssignment -SignInName “user@domain.com” `

-Scope “scope_name_or_id” `

-RoleDefinitionName “Reader”

#List all the Role assignment

Get-AzRoleAssignment

  • Interpret access assignments

Azure CLI

# Comment

az noun verb –name variable

PowerShell

# Comment

Verb-Noun -Parameters variable

Method of Changing the SID of a Windows Server 2016 VM

In a virtual environment, there are scenarios where you would want to clone an existing Windows server virtual machine to provide redundancy for whatever application.

Having the ability to create duplicate virtual machines by cloning it is a great feature but it creates a problem in a Windows Active Directory environment. There is a unique identifier called Security ID also known as SID which is created during installation to identify each machine in a Windows environment.

Active Directory has a big problem when it discovers two machines with the same SID because it identify them as the same object. If the computer with the same SID attempts to join the same domain, it will generate an error and terminate the process. No worries, there is a solution for the Windows computer.

Microsoft has included a tool called Sysprep which is natively installed on Windows server which is located in the folder path:

%systemroot%\System32\Sysprep

To start the process, you will navigate to the folder and follow the steps below:

  • Right click and Run the System Preparation Tool (Sysprep.exe) as an administrator
  • Select the option Enter System Out-of-Box Experience (OOBE) for System Cleanup Action with the option Generalize ticked.
  • Select the Shutdown option: Reboot
  • Then select OK.

Once the virtual machine reboots, it will prompt to select the usually Microsoft settings during initialization, accept the EULA and to set the Administrator password.

Note that this method does not remove any installed applications except device drivers. It also removes the usually windows configuration such as IP address and machine name.

The SysPrep will work in other versions of Windows.

reference: https://docs.microsoft.com/en-us/windows-hardware/manufacture/desktop/sysprep–generalize–a-windows-installation

Windows 10: Opening Program management tools and features from command prompt

Sometimes you may want to run open Programs and Features without searching for it in the Control Panel. Another reason to require these commands is to run them with administrative privileges.

You can open the Run using [Windows KEY] + [R] or the cmd or even in PowerShell ISE

appwiz.cpl – open the Programs and Features window.

appwiz

devmgmt.msc – open the device manager

devmgmt

compmgmt.msc – open the computer management

compmgmt

diskmgmt.msc – opens the disk management

diskmgmt

lusrmgr.msc – opens the local users and groups management

lusrmgr

I will update this article with more useful commands as I identify them.