Configuring Domain Controller Cloning

Note: There is an Microsoft Hands-on Lab with code WS00148 that can be used to conduct this exercise. The environment may be required to do additional configuration to execute some of these steps since it is not the main aim and you can ignore the steps in that lab to do your own configuration.

Before cloning a virtual Domain Controller (DC), there are a few requirements that needs to exist in the environment.

The requirements are listed below:

  1. There must exist a DC with the FSMO role PDC Emulator running on atleast Windows Server 2012 which is accessible on the network.
  2. The virtual DC to be clone must be running on a hypervisor that supports the feature VM-GenerationID.
  3. The source virtual DC must be running atleast Windows Server 2012 and is a member of the AD group Cloneable Domain Controllers.
  4. There must be a DC Clone Configuration XML file (namely DCCloneConfig.xml) that holds the settings the clone DC will use to configure itself.

To start the process of cloning a DC, the DC needs to be added to the Cloneable Domain Controllers:

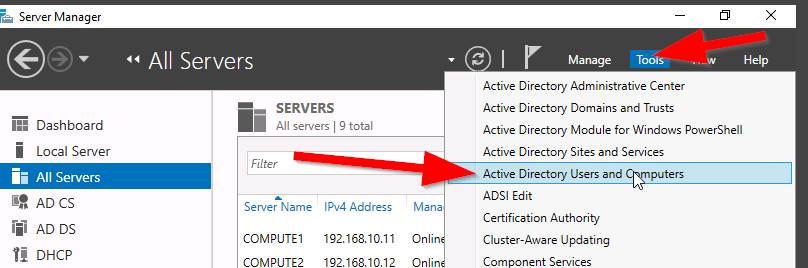
  1. Open Server Manager. server_mgr
  2. Then, go to the Active Directory Users and Computers (ADUC). aduc
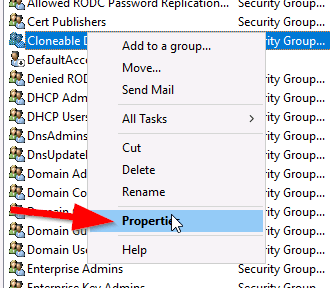
  3. Go to the Organization Unit (OU) Users,
  4. Select the security group “Cloneable Domain Controllers“. cloneable_group
  5. Right click and select Properties. cloneable_properties
  6. Then go to Members Tab and Add the DC here. select member
  7. Save and Close the settings.


Alternately, PowerShell can be used to the previous step, see command:


ADGroupMember -Identity ‘Cloneable Domain Controllers’ -member (Get-ADComputer SRV1)

Next step is to check for excluded Application and generate a file using PowerShell:

Open an PowerShell console and use this command:

This command generates a list of excluded applications that are added to the allowed list and saves it to the C:\Windows\NTDS\.

Get-ADDCCloningExcludedApplicationList -GenerateXml

The next command is used to create the DC Cloning configuration XML file that is used to configure the virtual DC clone that you will import into the desired Hypervisor.

New-ADDCCloningConfigFile -CloneComputerName “DCCloneName” -IPv4Address 10.10.10.10 –IPv4DefaultGateway 10.10.10.1 –IPv4SubnetMask 255.255.255.0 –IPv4DNSResolver 10.10.10.100,10.10.10.102 –Static

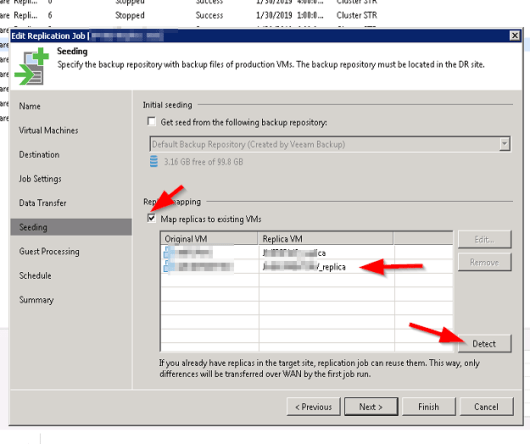
Now shutdown the VM DC, export a copy of it and then import it as a copy generating a new VM ID. Once the copied VM is booted, you should see the cloning process initializing at boot up. When the process is completed, it will reboot and the new cloned DC is ready for use.


Reference: https://docs.microsoft.com/en-us/windows-server/identity/ad-ds/introduction-to-active-directory-domain-services-ad-ds-virtualization-level-100

Useful Windows commands

This article was written to share the commands which can be executed on a Windows system to access different tools of the computer. This list will be updated as time goes by.

Open Local Users and Groups

lusrmgr.msc

Local Security Policy

secpol.msc

Local Group Policy Editor

gpedit.msc

Computer Management Tools

compmgmt.msc

Registry Editor

regedit

Disk Management tool

diskmgmt.msc

Execute a Group Policy Result Report

gpresult /H GPReport.html

GPReport.html

Flush the local DNS cache

ipconfig /flushdns

To change the default OU for Domain computer, use the redirect command

redircmp “OU=MyComputer,DC=domain,DC=com”

View the ARP list of MAC address linked to IP address

arp -a


Veeam Replication Error – Unable to discover replica VM

There was an Veeam Backup & Replication job notification with the following error:

Discovering replica VM Error: Unable to find mapping target VmRef [vm-40195]
Error: Unable to find mapping target VmRef [vm-40195]

Based the above error line “unable to find mapping target” means that the replica VM is missing or the replica VM is not mapped to the particular source VM. To resolve this issue, you will need to make the changes to the Replication Job settings for this source VM.

Open the Veeam Backup & Replication console.

veeam_b_r_console

Select Replication and right click and select Edit to modify the properties of the selected job.

veeam_edit_replica_job

Under Describe you DR site, tick Low connection bandwidth (enable replica seeding). Note: This allows you get the additional options to check the original VMs mapping to the replica VMs.

veeam_low_connection

Select Seeding on the left side to go directly to the Replica mapping settings.

veeam_replica_displayed

Under Replica Mapping, tick Map replicas to existing VMs if not already ticked.

It will show all the original VMs and their respective replica VMs. If there is a replica VM beside the source VM with error, it means that the replica VM is missing.

Select the Detect button to let Veeam discover all the replica VMs associated with the original VMs in the database. If the replica VM is showing No mapping, it means that the replica VM is missing or it is unable to detect the replica VM.

veeam_detect_replica

The replica VM was can manually selected by highlighting the original VM and select Edit. browse the vCenter for the replica and select it (this is only if it exist but not mapping automatically using the Detection method).

Select Finish and retry the failed replica job. One thing to note is when the retry job option is used, only the failed VM replication job is executed.

Cert Exam Prep: Exam 70-742: Identity with Windows Server 2016 – Study notes

  1. Install and configure Active Directory Domain Services (AD DS) (20–25%)

Install Active Directory

Know the PowerShell commands:

– Add the binaries

Add-WindowsFeature -name ad-domain-services—lncludeManagementTools -Restart

– Add a new forest

Install-ADDSForest —DomainName ‘corp.contoso.com’

– Add a new domain in an existing forest

Install-ADDSDomain -NewDomainName amer ParentDomainName ‘corp.contoso.com’

– Add a new domain controller in an existing domain

Install-ADDSDomainController —DomainName ‘amer. corp.contoso.com’

– Perform a staged read-only domain controller (RODC) installation

Install-ADDSReadOnlyDomainControl|erAccount –DomainControllerAccountName RODC1 -DomainName amercorp contoso com -SiteName Boston

* Then on RODC1: add the ad-domain-services feature, and domain controller role


Transferring and seizing FSMO roles

Exam Topic – What you should know!

Transfer FSMO Roles

  • Perform this on a domain controller which will be down for maintenance for a period of time, to ensure there is no loss of the fsmo service
  • Move-ADDirectoryServerOperationMasterRo|e -Identity “Target-DC” -OperationMasterRole SchemaMaster,RlDMaster,InfrastructureMaster, DomainNamingMaster,PDCEmulator

Seize FSMO Roles

  • Perform this if a domain controller is down and cannot be recovered, to ensure there is no loss of the FSMO service
  • Move-ADDirectoryServerOperationMasterRole -ldentity “Target-DC’ -OperationMasterRole SchemaMaster,RIDMaster,InfrastructureMaster,DomainNamingMaster,PDCEmulator -Force

FSMO roles can be represented by numbers

  • Move-ADDirectoryServerOperationMasterRole -Identity “Target-DC” -OperationMasterRole 0,1,2,3,4 -Force

– 0: PDC Emulator

– 1: RID Master

– 2: Infrastructure Master

– 3: Schema Master

– 4: Domain Naming Master


Additional common active directory install functions

Install from media

  • Useful when the database is on a domain controller across a slow WAN link
  • Install-ADDSDomainController —DomainName ‘amer.corp.contoso.com” -lnstallationMediaPath C:\ADMedia

Configure a domain controller to not be global catalog server

  • InstalI-ADDSDomainController —DomainName ‘amer.corp.contoso.com” —NoGlobalCatalog

Move the Infrastructure Master FSMO role

  • Needed if the domain controller will be a global catalog server
  • Install-ADDSDomainController —DomainName ‘amer.corp.contoso.com” -MovelnfrastructureMasterRolelfNecessary

Uninstall active directory and demote to a server

  • Uninstall-ADDSDomainController

Time-limited Group Memberships

Users can be added to a security group with time-to-live (TTL)

  • When the TTL expires, the user’s membership in that group disappears

Kerberos token lifetime will be determined by TTL of the user’s memberships

  • TGT (Ticket Generated Ticket) based on shortest group membership
  • ST (Shortest time) based on TGT and resource local domain group membership

Requires new FFL (Force Functional Level)

  • Scavenger thread takes care of cleaning up group memberships


Way to join a computer to the domain

System Control Panel

  • System added to default container unless pre—staged

Windows PowerShell

  • Add-Computer -ComputerName ‘Server1′ -DomainName ‘amer.corp.contoso.com’ -Credential Get-Credential -Restart

  • System added to default container unless pre-staged

Desired State Configuration (DSC)

  • Joins a computer to the domain, and re-joins if it ‘falls out‘ of the domain
  • Uses Start-DscConfiguration cmdlet, and can be set to check compliance every x minutes

Offline domain join

  • Run djoin.exe on a domain controller to pre-stage the object and create provisioning file
  • Run djoin.exe on target computer and point to the provisioning file

Tips

  1. Know the PowerShell commands for installing and managing Active Directory
  2. Active Directory, FSMO Roles, DNS. Group Types and scopes haven’t really changed, but if you haven’t managed them lately, brush up
  3. Desired State Configuration (DSC) can be used to join a server to the domain and rejoin it if necessary


  1. Manage and Maintain AD DS (15-20%)

Configure service authentication

Service Accounts

  • Used to enhance security but the pain point is the password management and SPN mgmt.
  • Two types: Managed Service Accounts and Group Managed Service Accounts

Create/configure Managed Service Accounts

  • Used for a single computer or server
  • New-ADServiceAccount with the —RestrictToSingleComputer parameter
  • Not supported for scheduled tasks, Exchange, SQL

Create/configure Group Managed Service Accounts

  • Used for multiple servers
  • Minimum of one DC that runs at least Windows Server 2012
  • Before you begin, must create KDS Root Key: Add-KDSRootKey -Effectivelmmediately
  • New-ADServiceAccount and Set-ADServiceAccount

Configure Kerberos delegation

  • IIS may require the Trust this computer for delegation to any service (Kerberos only) option

Manage Service Principal Names (SPNs)

  • Use SetSPN <service type>/<instance name>:<port number>/<service name>


Veeam Replication Job Trouble Ticket # 1

There was an email notification received from the Veeam B&R server stating that one of the VM replication job had failed with the following error:

Error: Failed to open VDDK disk [[Datastore_Name] VM_replica/VM2-000001.vmdk] ( is read-only mode – [false] ) Logon attempt with parameters [VC/ESX: [vCSA_Name];Port: 443;Login: [domain\account_name];VMX Spec: [moref=vm-40195];Snapshot mor: [snapshot-112166];Transports: [nbd];Read Only: [false]] failed because of the following errors: Failed to open disk for write. Failed to download disk. Reconnectable protocol device was closed. Failed to upload disk. Age

The first thing done was to log into the Veeam backup server and open the Veeam Backup & Replication console.   veeam_b_r_console

Under the Home, navigate to the Replicas, search for the VM. Then highlight it and right click and open the properties. It will show all the replica jobs which are snapshots on the replica VM in vSphere.


The two last replica job shows that they were incomplete. This sometimes indicate that there was a problem with the snapshot that was created. Logon to the vSphere web client and check the snapshot manager for the replica VM (the default naming convention is “VMName_replica“). Open the option Snapshots–>Manage Snapshots and you will expand the snapshots until you reach the last two set before “You are here”.

vsphere_snapshot

In the image, you will notice that the snapshot names “Veeam Replica Working Snapshot” which indicate that the snapshot was not completed. To eliminate the job continue failing is to delete all the snapshots with the title “Veeam Replica Working snapshot” and rerun the job from veeam so it can recreate the snapshot. If these snapshot are allowed to remain, the Veeam replica job will continue to fail.

I hope this help to resolve some of the veeam replication job failures.

Computer blocked by Port Security

My colleague was working on an issue where a computer was communicating on the network through a Cisco switch that had port security enabled. As usually, he disables port security and re-enables it in an attempt to get the new mac address registered on the port. The computer (A) was now able to get an IP address from the DHCP server but unfortunately, the computer (A) still was not able to communicate with the server. In an effort to identify whether the problem was with computer (A) or the network port, another computer (B) was connected to the port which was successful. But when computer (A) was reconnected to the same port, there was still no communication. All network settings on Computer (A) were verified to be correct but still no break through. The same computer (A) was taken to another switch in another location and surprisingly it worked. So hhhmmm….what could be the problem? It was escalated to me to investigate further as he could not identify what was the root of the problem.

I started to ask the question “What is working?”

The responses were:

  1. Other devices were communicating when connected to the port
  2. The computer (A) is getting an IP address from the DHCP server
  3. The computer (A) is able to communicate on other switches

Next question, did they try the computer (A) on another port on the same switch? Response was No.

Anyways, everything was connected back to how it was before and then I started the troubleshooting.

The following observations were made:

  1. Port-security was enabled on the entire switch but disabled on this troubled port.
  2. The port duplex and speed was ok (Full/100)
  3. The computer (A) got an dynamic IP address from the DHCP server
  4. The computer (A) mac address was not showing on the port when I check the MAC address table for the problem port (f0/42)
  5. Port security sticky address listing showed that computer (A) mac address was tied to port f0/22

What do you think the root of the problem is?

The computer (A) is not able to communicate with anything on the network because the mac address of the computer (A) was tied to another port so when devices response to the packet, it is returning to the wrong port. so the solution was to remove the sticky address and allow the switch to relearn it over the new connected port (f0/42). Another question resonate in my mind was “How did it get an IP address from the DHCP server?”. But if you review how devices acquire an IP address, it is using broadcast. Therefore, the computer will always get an IP address but it would not be able to communicate with other devices.

I hope this troubleshooting scenario helps someone with understanding port-security on a Cisco switch.

Polycom phone “go off hook” error message

I was called to assist with an incident ticket whereby a Polycom SoundStation IP 6000 conference phone was not able to make or receive calls.

The first thing I did was to check what was the error message when trying to call the phone. The error displayed was “go off hook” and initial impression was that the phone was plugged out but based on the error this could not be the case.

When I check the phone screen, it was showing that the phone was being forwarded to an extension that did not exist hence the error. A little background knowledge, this phone is connected to an Alcatel VoIP Telephony system using the sip protocol. The way this system works is that is an extension does not exist in the system, it immediately give a message “go off hook” so it was strange when I got this message when testing the issue.

So the solution as you probably conclude is to disable the forwarding (which should not even be on a conference phone).

Active Directory Domain Services Offline and Defragmentation

There is a tradition method of taking the Microsoft Active Directory Domain Services (AD DS) offline to perform maintenance on the database is using the Directory Service Restore Mode (DSRM). The steps are listed below:

  1. Log into your Domain Controller (DC)
  2. Open the command prompt
  3. Run the command:

    bcdedit /set safeboot dsrepair

  4. Reboot the DC so the it can enter into safe mode

To exit the safe mode, run the command

bcdedit /deletevalue safeboot

and then reboot for the DC to return to normal mode.

Another method of taking the AD DS offline is by stopping the AD DS service using the services applet (services.msc).

Now to perform defragmentation on the AD DS database is to use the NTDS utility.

Execute the following command at the prompt:

ntdsutil

activate instance ntds

files

compact to c:\

integrity

quit

quit

copy c:\ntds.dit c:\windows\ntds\ntds.dit

del c:\windows\ntds\*.log

Restart the AD DS services.

Restart-Service NTDS

Please note that you don’t have to restart the server after the maintenance of the database.